During the development of my asset-pipeline in Block B year 2 I noticed that the loading times of high-quality
textures were quite long. To improve this I was introduced texture compression. This article will example
my process and findings during this project.
It includes interactive examples, comparisons, and sketches to
explain the concept of texture compression and how it can be used to improve loading times.
S3 Texture Compression
Textures are everywhere in games. They are a fundamental component in creating believable virtual
worlds. High-quality textures are essential for pushing the boundaries of realism in games.
Take this scene from Detroit: Become Human (2018). While you may not see every texture, many of
them are used behind the scenes to render realistic lighting. According to the developers:
In Detroit: Become Human, we can have more than 4,000 textures in a frame.

Source: gpuopen.com
What is a Texture?
Before we start talking about texture compression, let's first understand what a texture is and what it
is made out of.
A texture is a file with a collection of pixels. Each of these pixels represent a color and when you put
those colors next to each other you get a picture. It's basically the same as you screen monitor, a
whole bunch of small colors (aka pixels), represent 1 big picture.
But what actually is a pixel?
On a high-level it's a color, but computers do not know color, a computer only knows numbers (1's and
0's). So how do we tell the computer that we want to display a color?
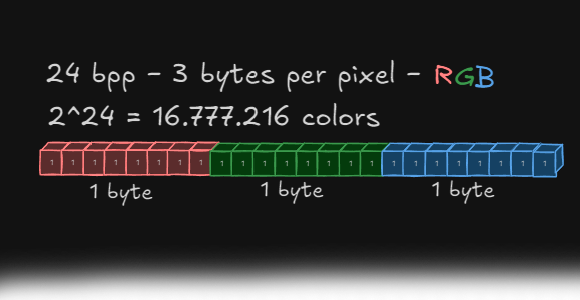
This is where color channels come
into place. Each
pixel has 3 channels, red, green, and blue. If you mix these 3 colors, you can almost make any
color that exist.
(Interactive)
#ffffff
(255, 255, 255)
I say almost because there are limitations. The amount of colors you can make is based on the bpp (bytes per pixel). Having a higher bpp means the computer has more space to represent a color. Images below show the color range based on the amount of bpp.

The amount of data per pixel can significantly impact image quality. Choosing a low bits-per-pixel (bpp) can result in visible edges. However, simply increasing the bpp to eliminate these edges isn't always possible or needed for two main reasons:
- File Size: As show in the images, higher bpp values lead to larger file sizes. While an increase of 1 or 2 bytes might seem minor per pixel, a 1920x1080 texture contains 2,073,600 pixels, resulting in a substantial increase in total data.
- Human Perception: The human eye can distinguish around 10 million different colors (Source: wikipedia ). This is why the difference between 16 bpp (32k colors) and 24 bpp (16 million colors) is noticeable on a good monitor. However, increasing the bpp from 24 (16 million colors) to 48 (281 trillion colors) does not provide a perceivable improvement.
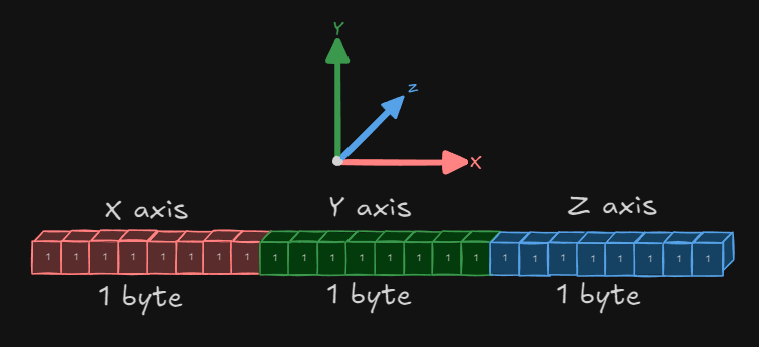
In games, textures aren't always used solely for visual display. Some textures contain data that isn't directly visible to the player. For example, a normal texture. Instead of using the RGB channels to represent color, they contain 3D direction information. This data is then used to render the scene.
The most common bpp is 32 bpp (1 byte per channel). This provides 16 million colors like 24 bpp, but adds another 1 byte for 256 levels of transparency (alpha channel). C++ programmers might know them as unsigned int or uint32_t.

Having a 32 bpp texture is great for quality. However, 4 bytes per pixel can drastically increase the file size of a texture. If we look at a 4096x4096 texture:
| Uncompressed | - RGBA | = 67,108,864 bytes | = (67.1 MB) |
| Compressed | - png | = 178.690 bytes | = (174 KB) |
As you can see, the file size is reduced by 99.7% by using a compressed format without losing any
quality (aka lossless compression). How PNG compression works is a whole other can of worms, but if
you're interested, I recommend watching this video by
Reducible on Youtube.
The only downside of PNG is that it's not the most efficient format for video games. Having to
decompress the png data into useable RGB values takes times. This is where
texture compression comes into play.
All 16,777,216 colors of 24-bit RGB palette in a 4096 × 4096 bitmap (click to enlarge)

Source: wikimedia.org
Texture Compression
In video games, speed if crucial. Nobody wants to wait minutes for a game to load.
This is why texture compression is used. It changes the way pixel data is stored on disk so that
it's more efficient to load into the game.
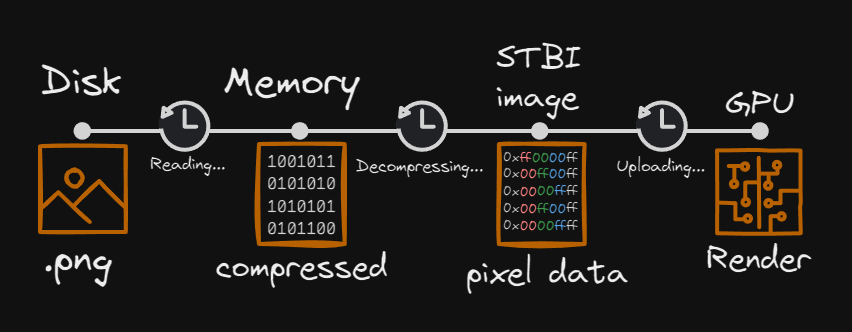
There are a couple of steps when it comes to loading a texture.
- Disk: This is where the texture is read from disk into memory.
- Memory: The texture gets decompressed into a format that the GPU can understand.
- GPU: The texture is uploaded to the GPU memory. Ready to render.
Loading process of a png:
If we take the textures from DamagedHelmet.gltf and look at their loading times, we get this result (average of 10 runs):
| Texture | File size (KB) | Reading from Disk (ms) | Decoding Time (ms) | Uploading to GPU (ms) |
|---|---|---|---|---|
| metalRoughness | 1,271 | 20.88 | 177.33 | 1.70 |
| albedo | 897 | 14.92 | 67.15 | 2.17 |
| normal | 506 | 3.69 | 23.80 | 1.68 |
| AO | 354 | 6.08 | 54.12 | 1.89 |
| emissive | 60 | 1.12 | 47.84 | 1.97 |
| Total | 3,088 KB | 46.69 ms | 370.24 ms | 9.41 ms |
There are a couple of things we can do to speed up these times. Both
the reading from disk and uploading to the GPU are bound by the size of the data. So decreasing
the
size of the data will speed up those steps. Decoding is the part that takes the most time,
converting the
compressed PNG data to RGBA values that the GPU can understand.
Here is where texture compression comes into play.
S3 Texture Compression
S3 Texture Compression (S3TC) was developed by S3 Graphics in the late 90s. It was first implemented as
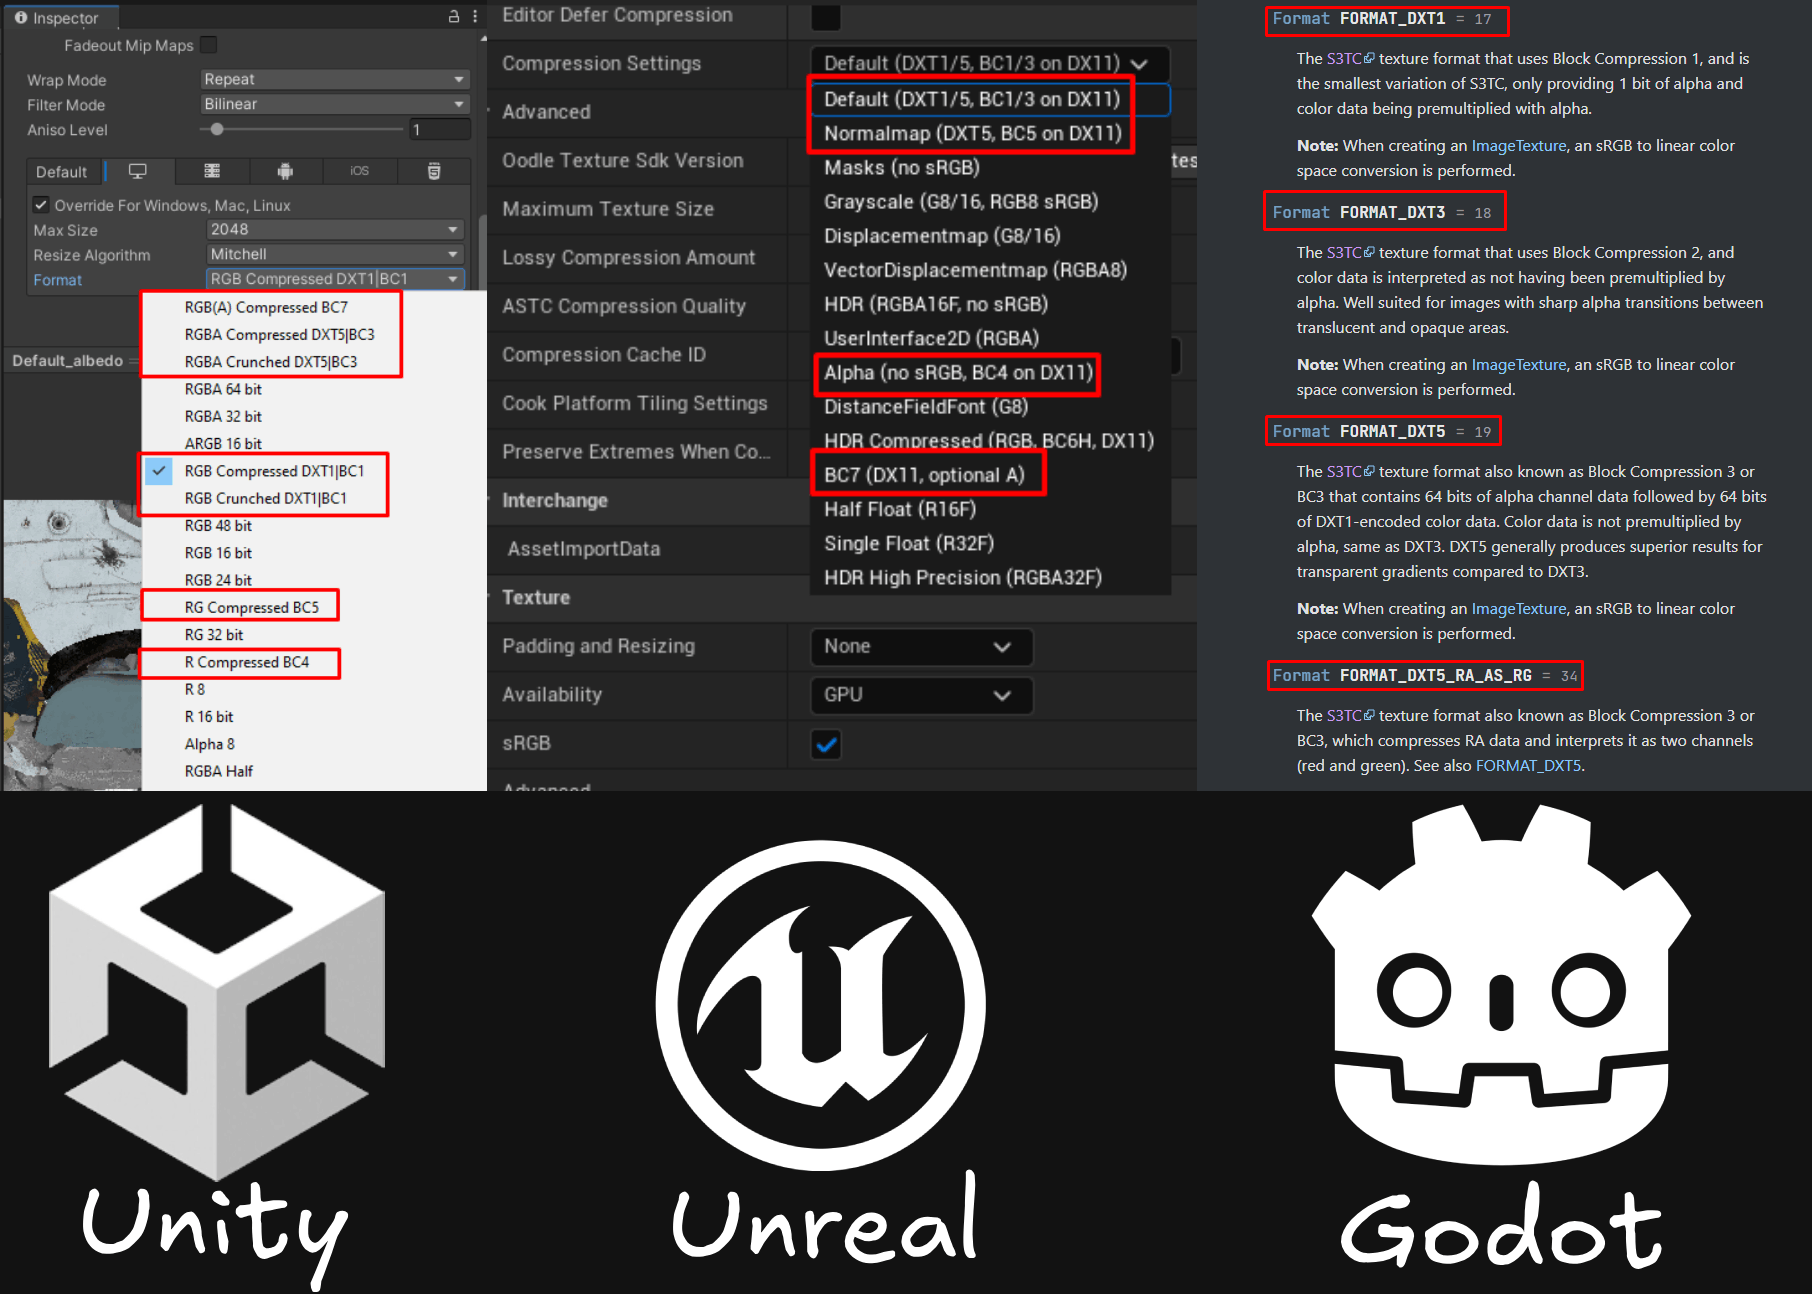
part of the DirectX 7 API by Microsoft. Even though it's old, it's still widely used in the industry and
you can find it in almost every game engine.
S3TC is a family name for a group of lossy texture compression algorithms. It's used to reduce the size
of textures in memory and increase loading times.
There are several S3TC formats/methods, each with their own use cases. The main differences between S3TC and PNG are:
- Pros (compared to PNG):
- No decoding times
- Reduces memory usage
- Reduces GPU uploading time
- Cons (compared to PNG):
- Lossy compression
- Bigger file size on disk
Loading process of S3TC:
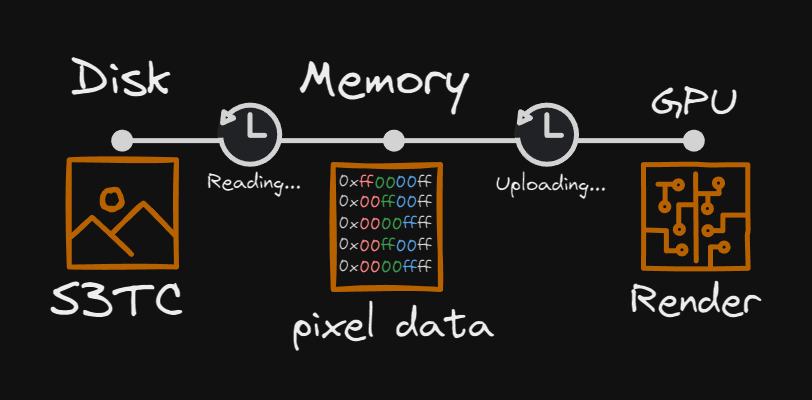
With S3TC we can skip the whole decoding step. This part took the longest when using PNG. This is
possible because the
data is already in a format that the GPU can understand. This is why we only have to read it from disk
and upload it directly to the GPU.
Using the same textures as before but now using an S3TC algorithm, we get the following results (average
of 10
runs):
| Texture | File size (KB) | Reading from Disk (ms) | Decoding Time (ms) | Uploading to GPU (ms) |
|---|---|---|---|---|
| AO (BC4) | 2,049 | 36.09 | 0.0 | 0.334 |
| albedo (DXT1) | 2,049 | 35.94 | 0.0 | 0.286 |
| emissive (DXT1) | 2,049 | 35.40 | 0.0 | 0.294 |
| metalRoughness(DXT1) | 2,049 | 34.84 | 0.0 | 0.238 |
| normal (DXT1) | 2,049 | 35.40 | 0.0 | 0.306 |
| Total | 10,240 | 177.67 | 0.0 | 1.458 |
If we compare this to the PNG results, we see a significant improvement in loading times.
| Type | File size (KB) | Reading from Disk (ms) | Decoding Time (ms) | Uploading to GPU (ms) |
| PNG | 3,088 | 46.69 | 370.24 | 9.41 |
| S3TC | 10,240 | 177.67 | 0.0 | 1.458 |
| Difference | +7,152 KB | +130.98 ms | -370.24 ms | -7.952 ms |
Giving us a total improvement of 248.212 ms in loading times. With the biggest improvement in the
decoding.
Now as you might have noticed the file size has increased by 7,152 KB. Compared to the PNG file size of
3,088 KB.
This is the trade-off you have to make when using S3TC. You get faster loading times but at the cost of
a bigger file size and a loss in quality.
But what does this loss in quality mean? What does S3TC actually do?
How does S3TC work?
While S3Tc is not 1 algorithm, they all work in a similar way. They all use a technique called
block-based compression. Instead of compressing the whole texture at
once, they split the texture into blocks of 4x4 pixels (aka a Texel). Each block is then compressed
individually.
As said before, these algorithms are lossy. This means that some data is lost during the compression.
But for some textures, this is not a problem.
If we look at each algorithm, we see that they all have their own use cases:
| Algorithm | Use Case | Color Channels | Bytes per 4x4 block |
|---|---|---|---|
| BC1 (DXT1) | Opaque textures | RGB, alpha per texel (on/off) | 8 bytes |
| BC2 (DXT3) | Explicit alpha | RGBA 4 bit alpha per texel (0–15) | 16 bytes |
| BC3 (DXT5) | Interpolated alpha | RGBA, interpolated alpha per pixel (0-255) | 16 bytes |
| BC4 | Single channel textures | Only red. No green, blue and alpha | 8 bytes |
| BC5 | Two channel textures | Only red and green. No blue and alpha | 16 bytes |
| BC6H | High dynamic range textures | RGB with high precision | 16 bytes |
| BC7 | High quality textures | RGBA | 16 bytes |
Every algorithm focuses on a different aspect of the texture, and thus has a different way of
compressing. If we look at BC1 (DXT1) for example, the way it works is quit interesting.
It stores 16 pixels in 64 bits (8 bytes). It does this by storing the endpoints (min and max) color of
the block.
Then using these 2 colors it uses a 2-bit lookup table to determine the color of each pixel. Imags below
show how this works.
(Drag or use orange arrows to navigate)
Step 1
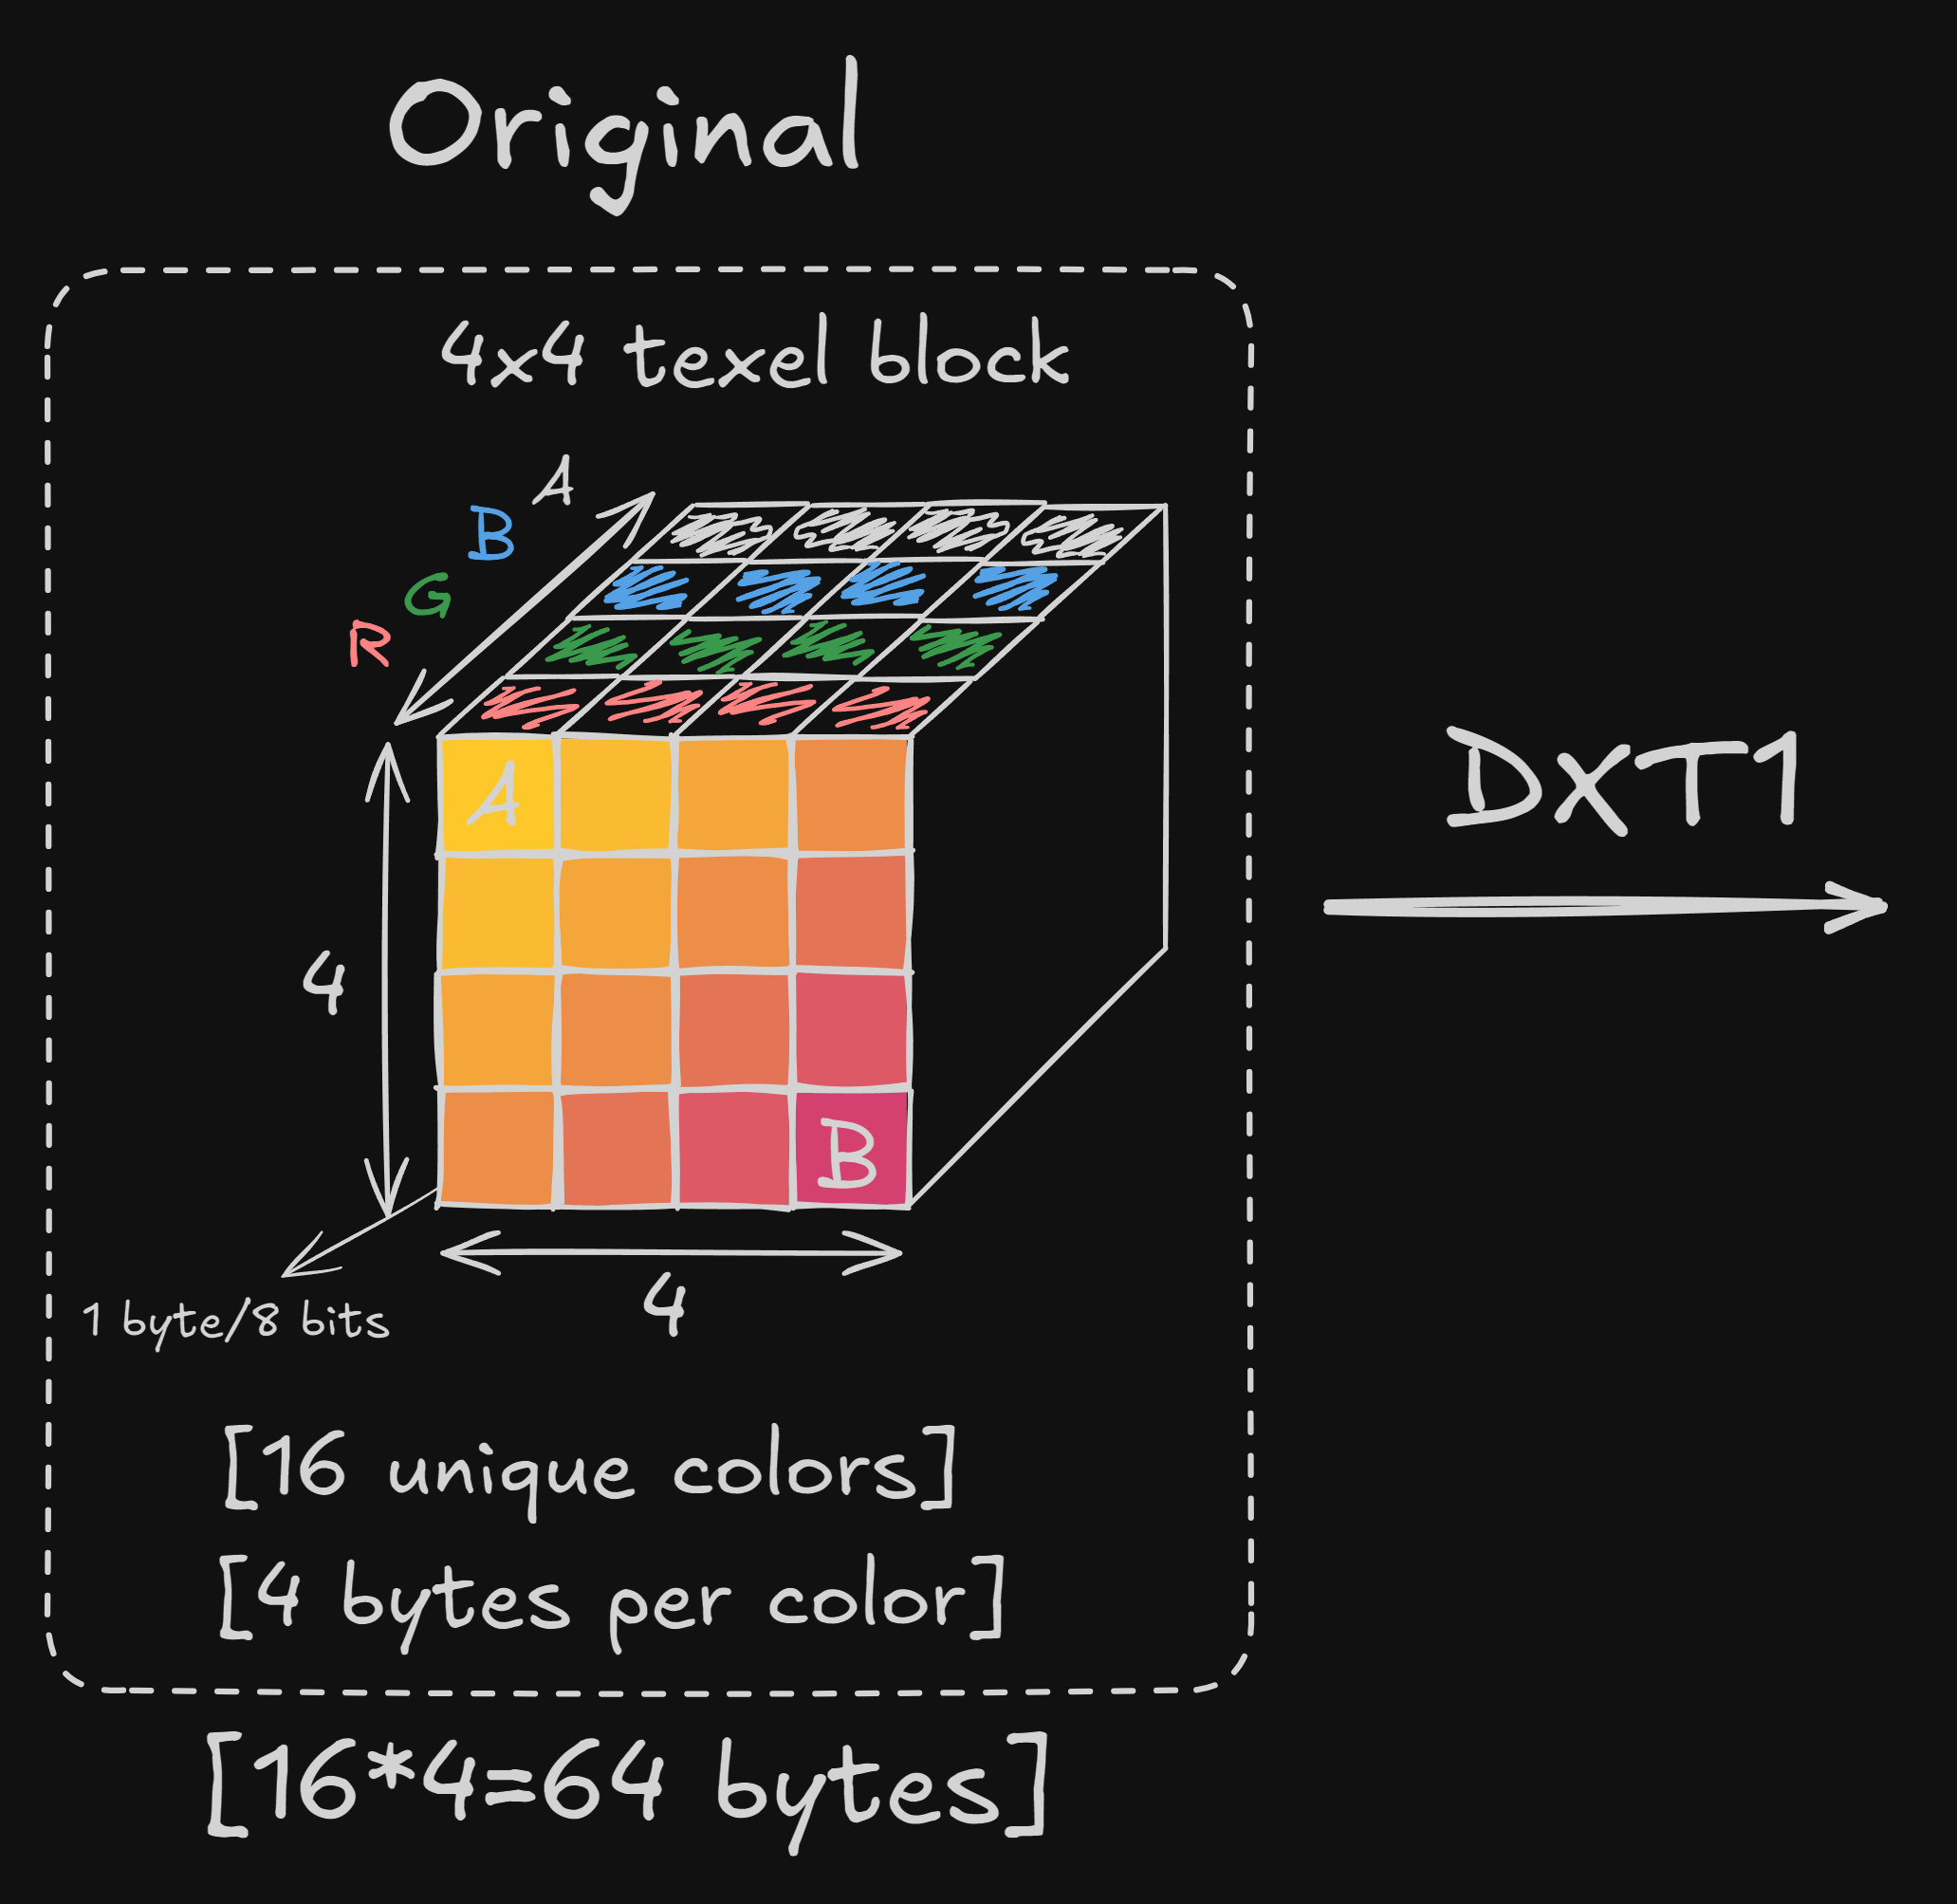
Original block stores the RGBA channel for every pixel. DXT1 checks for the min and max color values (marked as A & B)
Step 2
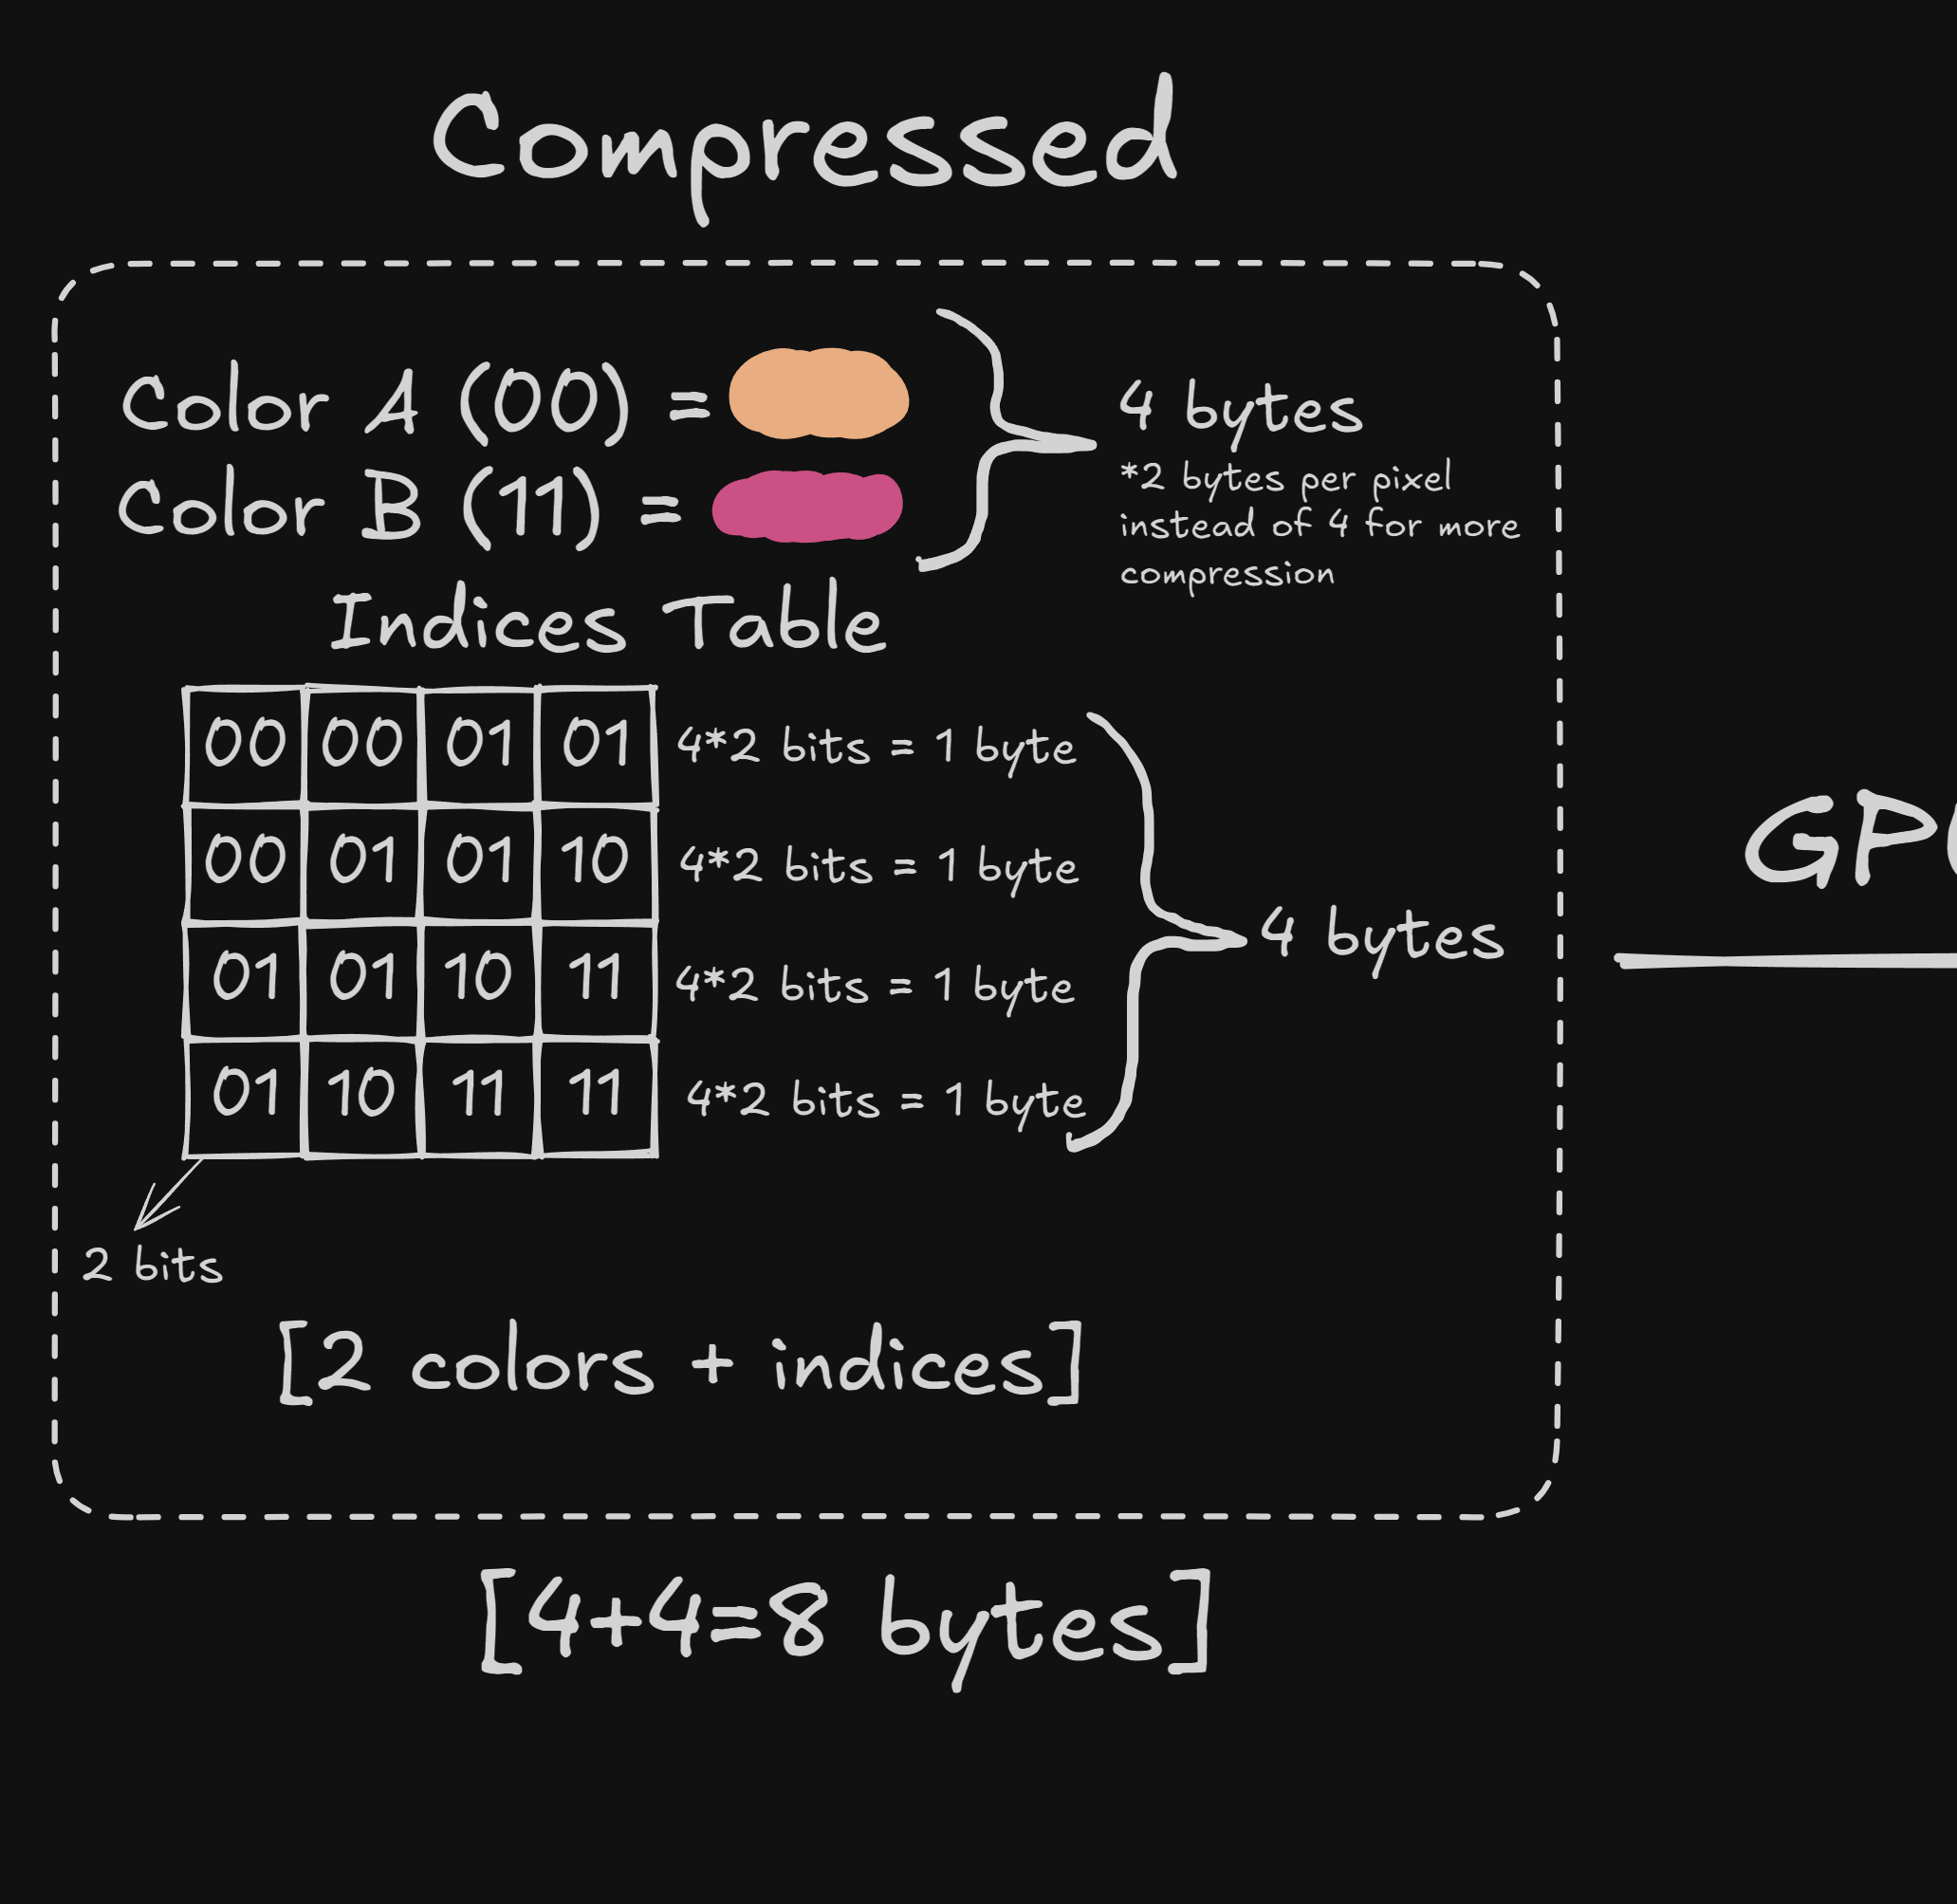
With the min and max color, DXT1 makes a 4x4 2-bit lookup table. This lookup table contains an index (0-3) to a color.
Step 3
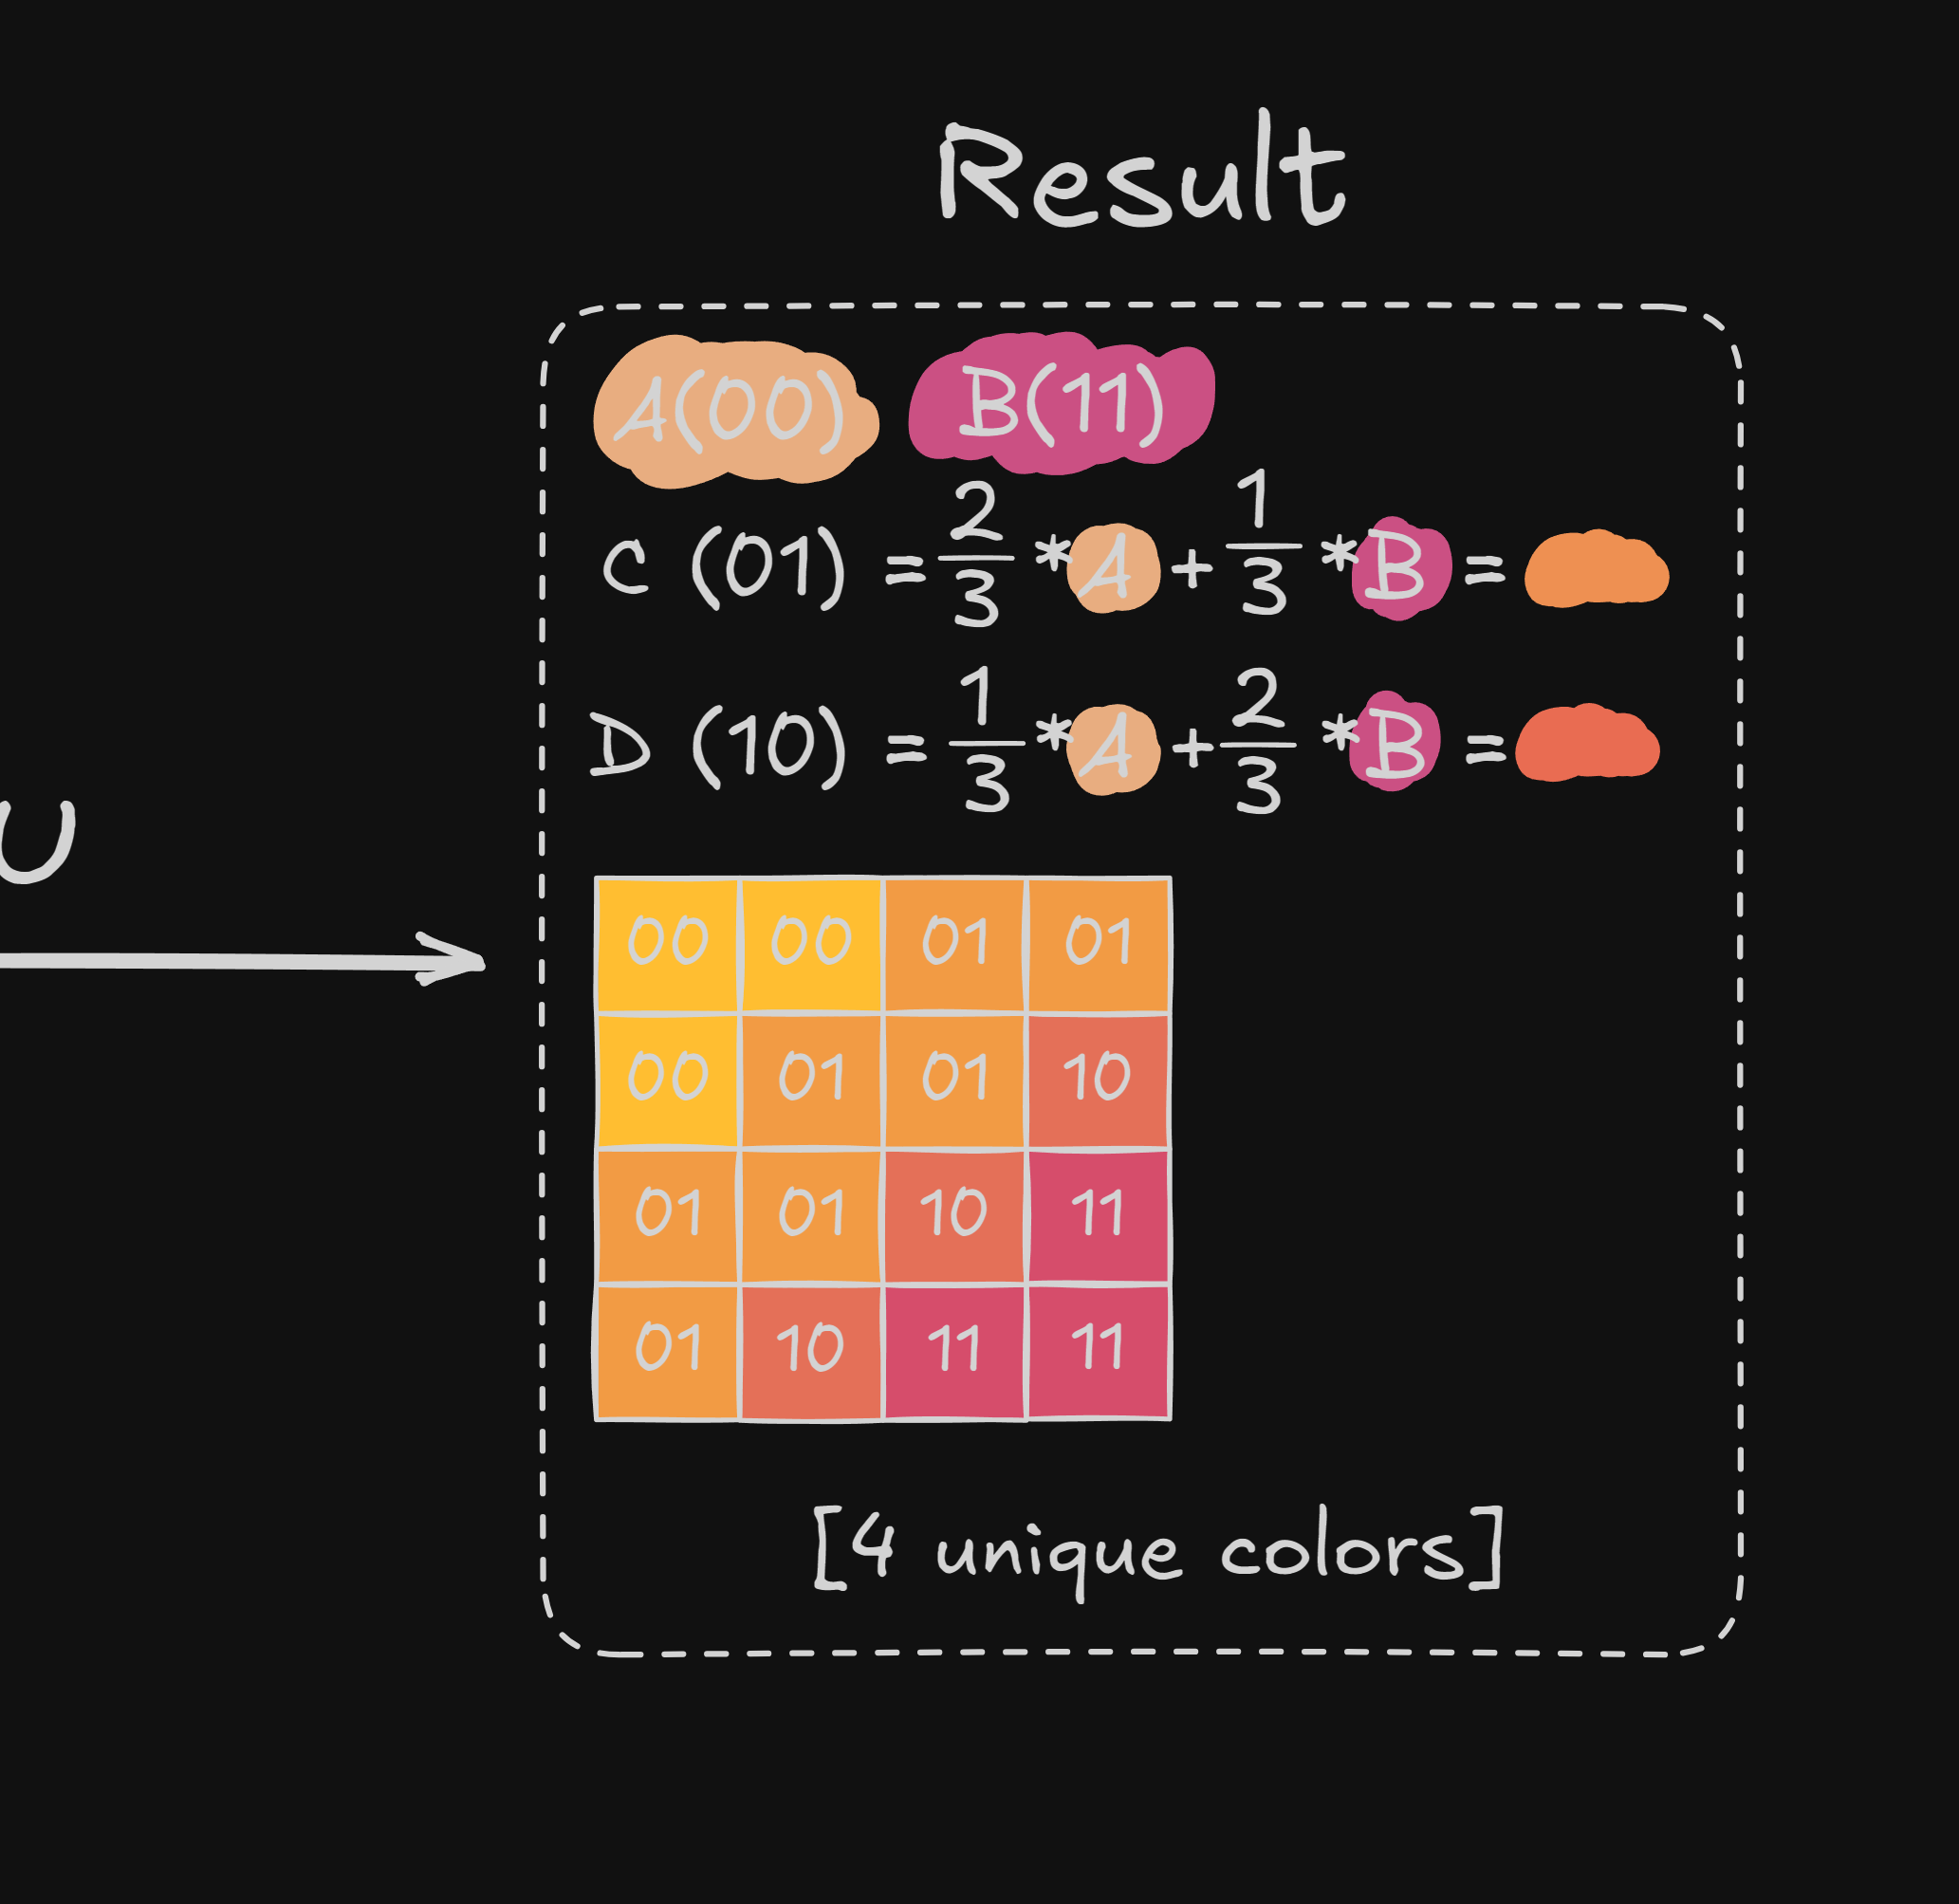
On the GPU it calculates the color for each pixel based on index. 00 = min, 11 = max, 01 & 10 = interpolated based on min and max.
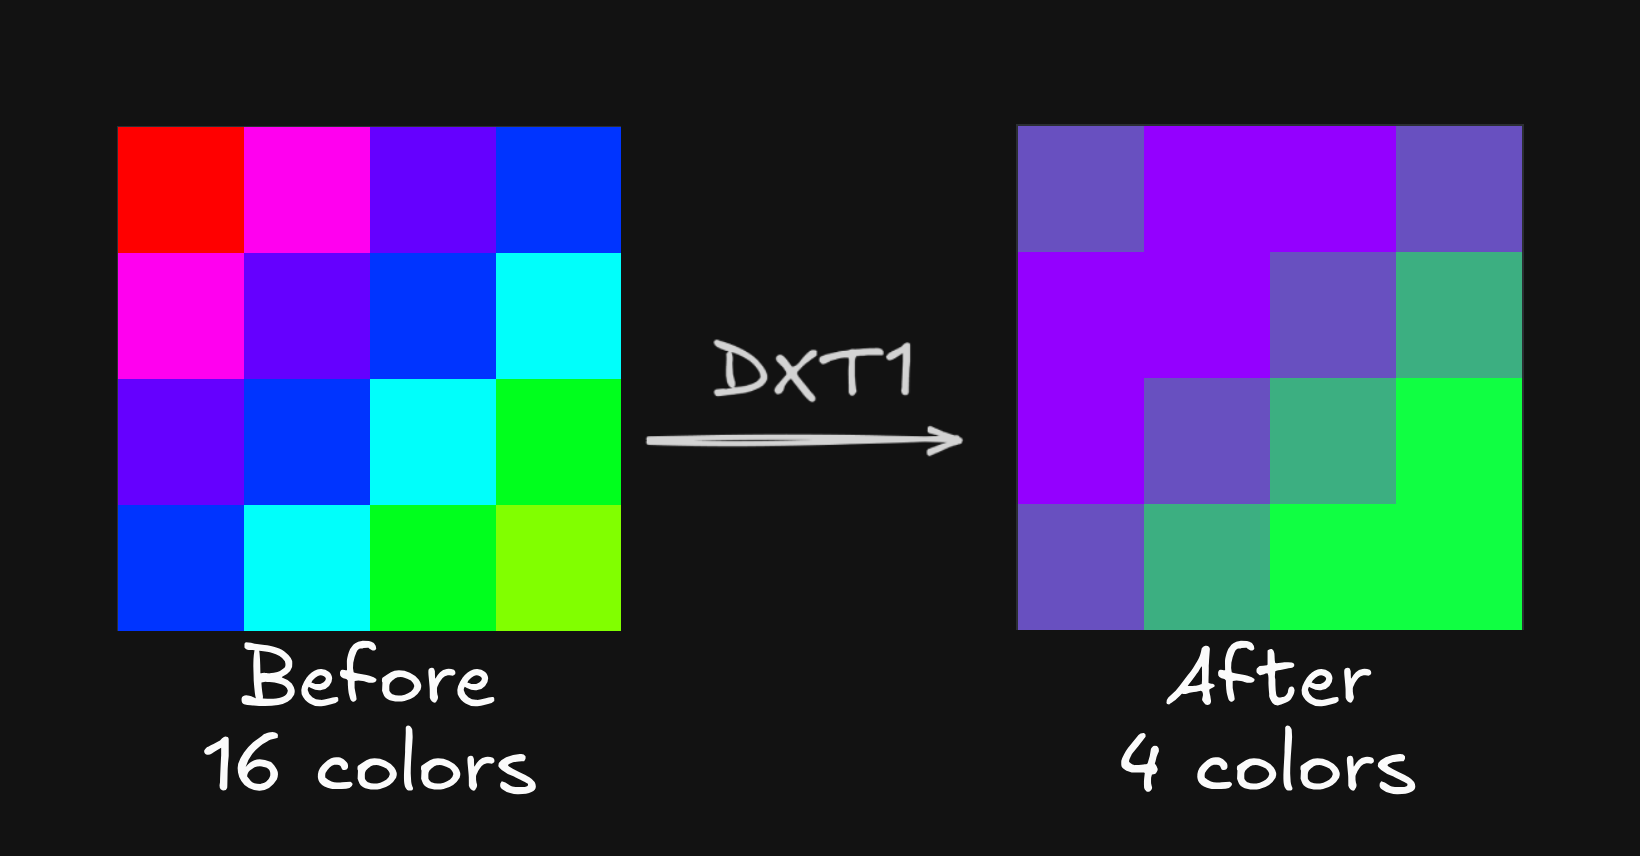
As show, using DXT1, we go from 16 possible colors to just 4 colors. For the example image this isn't really a problem. It was already a gradient with similar colors. But if we have a texture with a lot of different colors, this can result in visible artifacts.
Spectrum before and after DXT1 compression
Reducing the amount of colors isn't the only thing that can happen. If we look at BC4, the way it reduces the size is by only storing the red channel. And thus discarding the green, blue, and alpha channel. This is great for textures that only need a single channel, like a height map. Because it only stores the red channel compared to the 3 channels in DXT1, it has more space to store data, resulting in a higher quality texture.
Gradient before and after BC4 compression
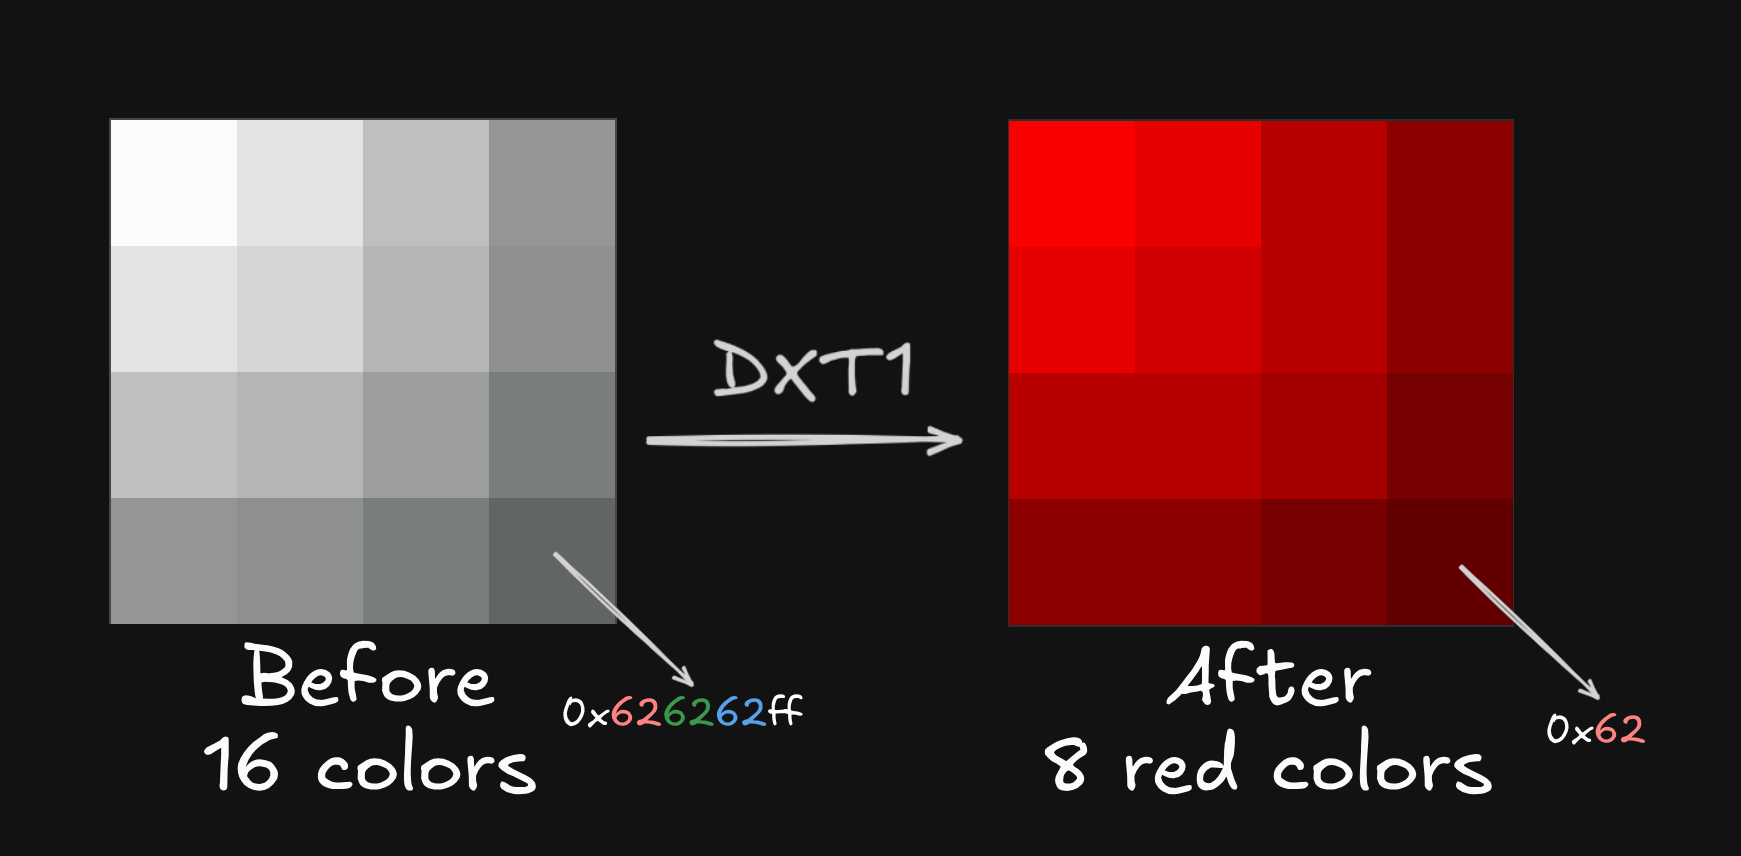
While we lost some colors, compared to png, we gained more color compared to DXT1.
Comparisons
Difference in quality
As said before, we are losing quality when using S3TC. Sometimes this loss is not noticeable. Image below shows the difference between all textures using PNG, all using DXT1, and all using DXT1 except the normal map.
Difference between png and DXT1 (move slider to see difference)
If you look between A and B, there isn't much of a difference at first glance. But if you look at the reflections, like on the glass or the metal, you can see the difference. More zoomed in:
Zoomed in difference (click to enlarge)
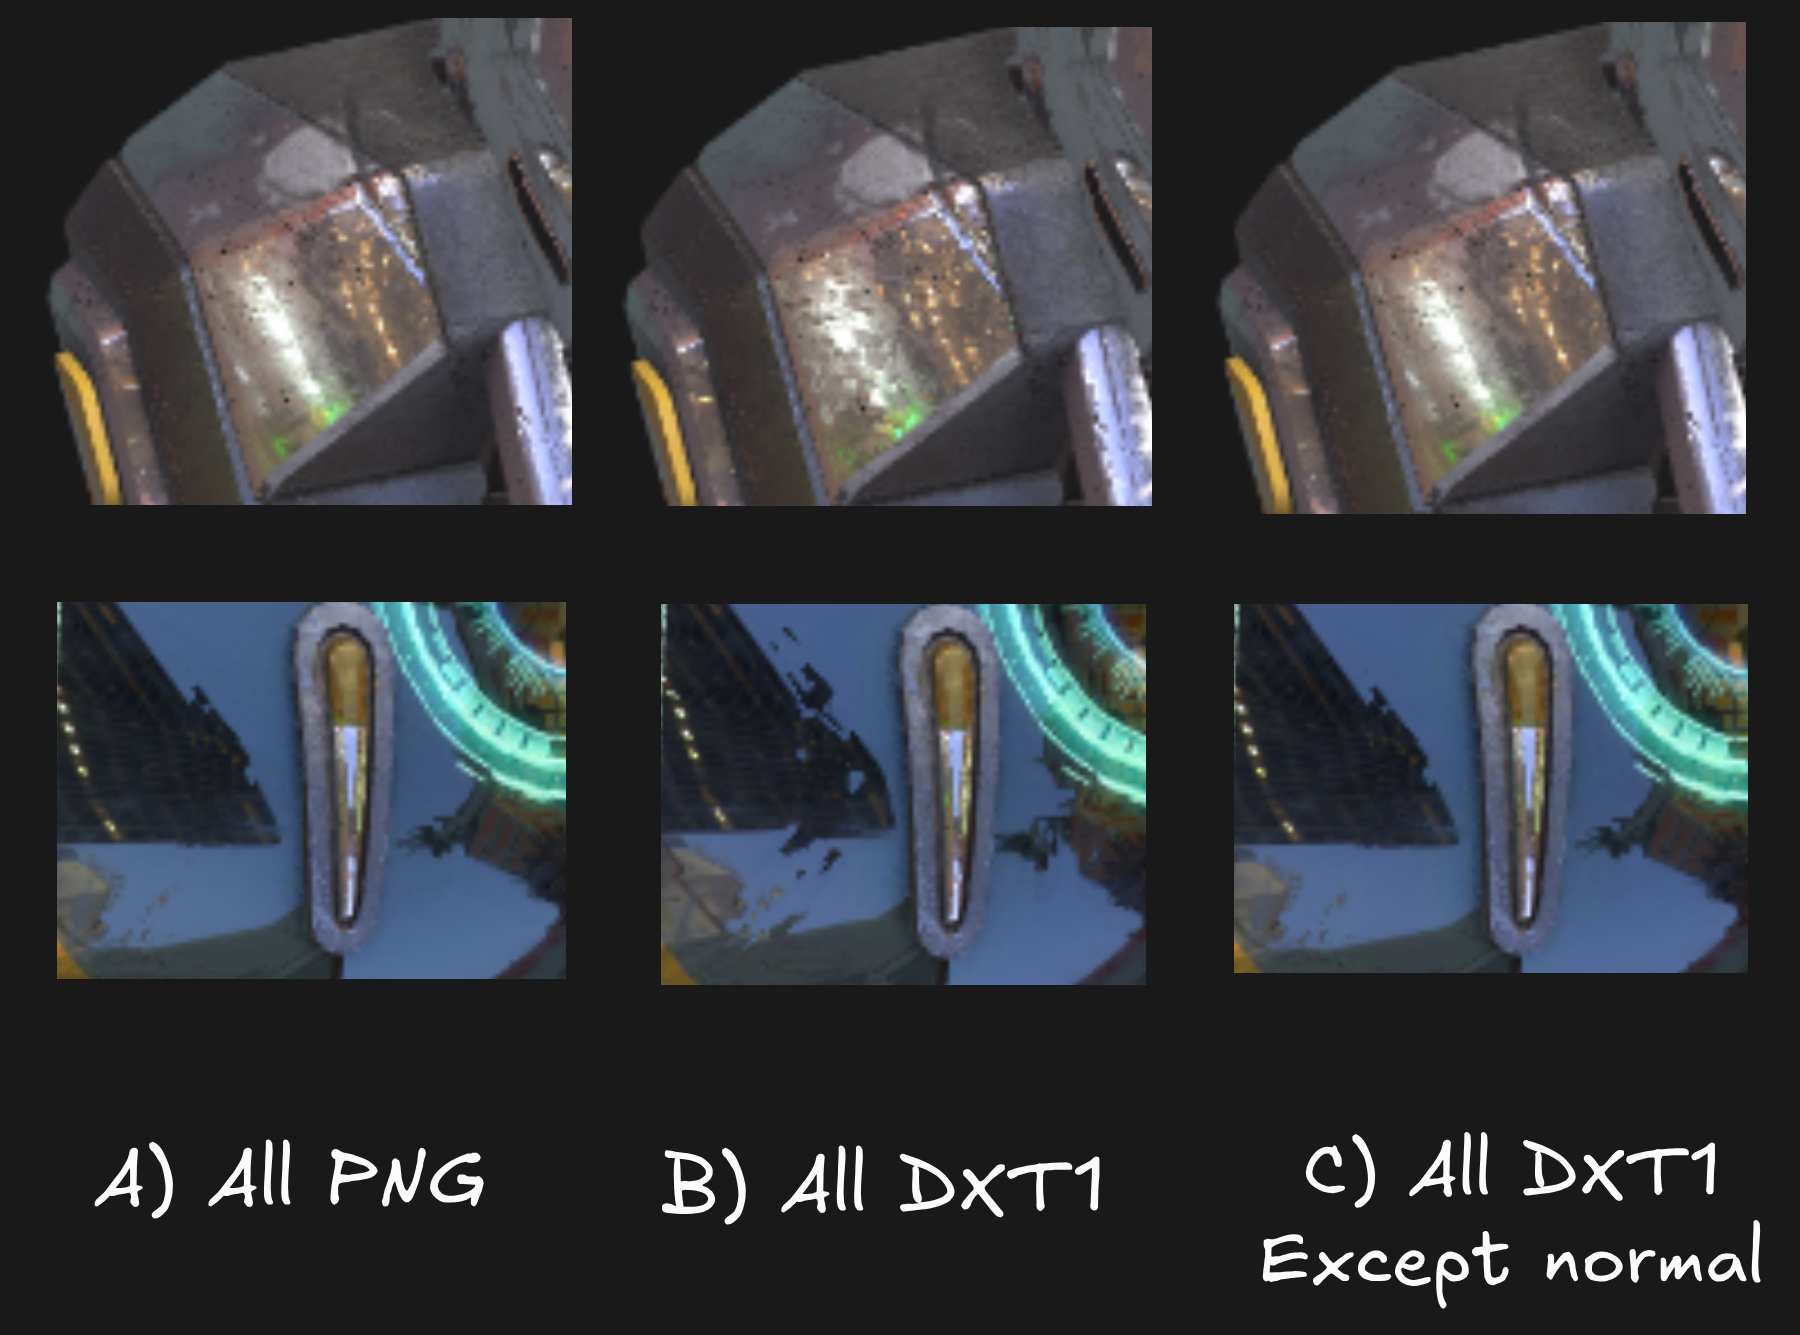
This difference is because we're using DXT1 for the normal map. This is not recommended, normal map textures require a lot of precision. Using DXT1 will result in visible artifacts. For that reason some game engines don't even allow you to use DXT1 for normal maps.
Difference in speed
I already showed the difference in loading times between PNG and S3TC using the DamagedHelmet textures. But how does it scale with other resolutions?
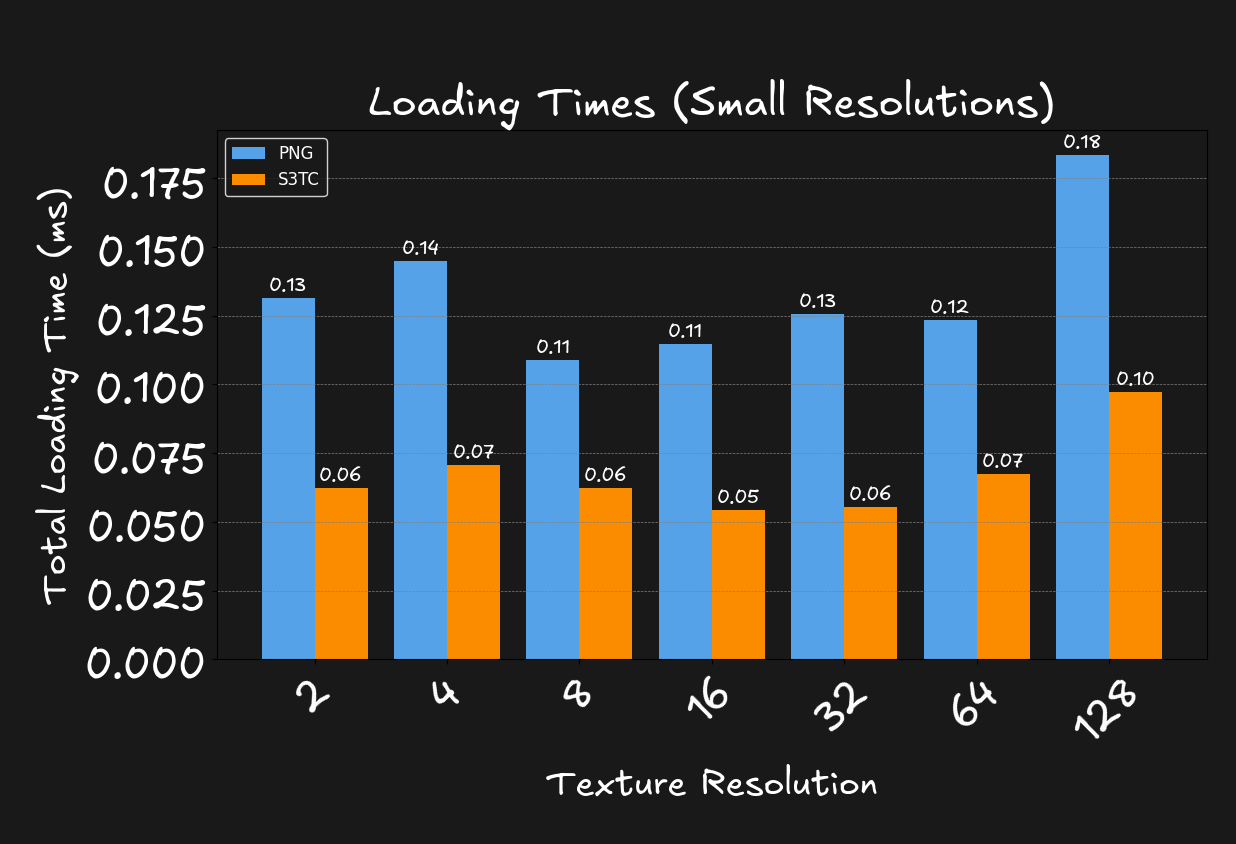
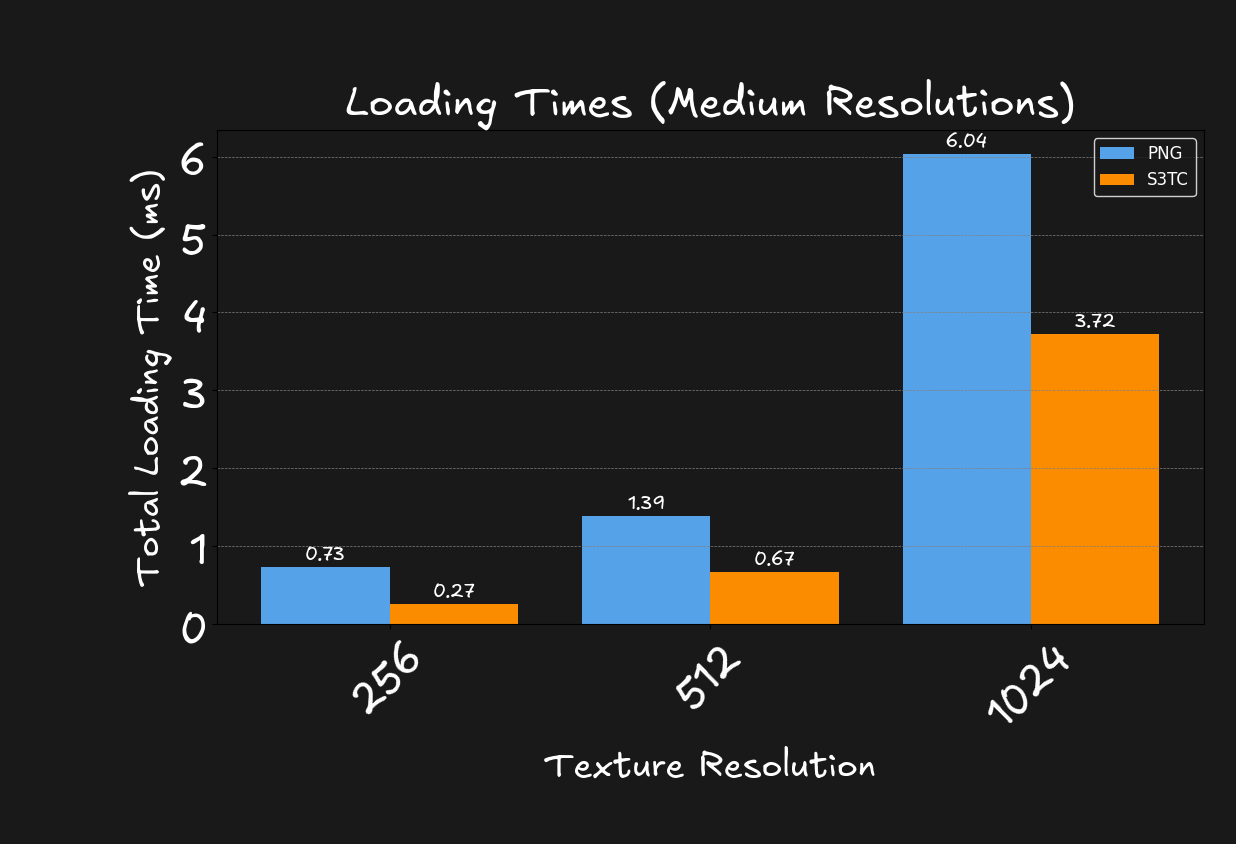
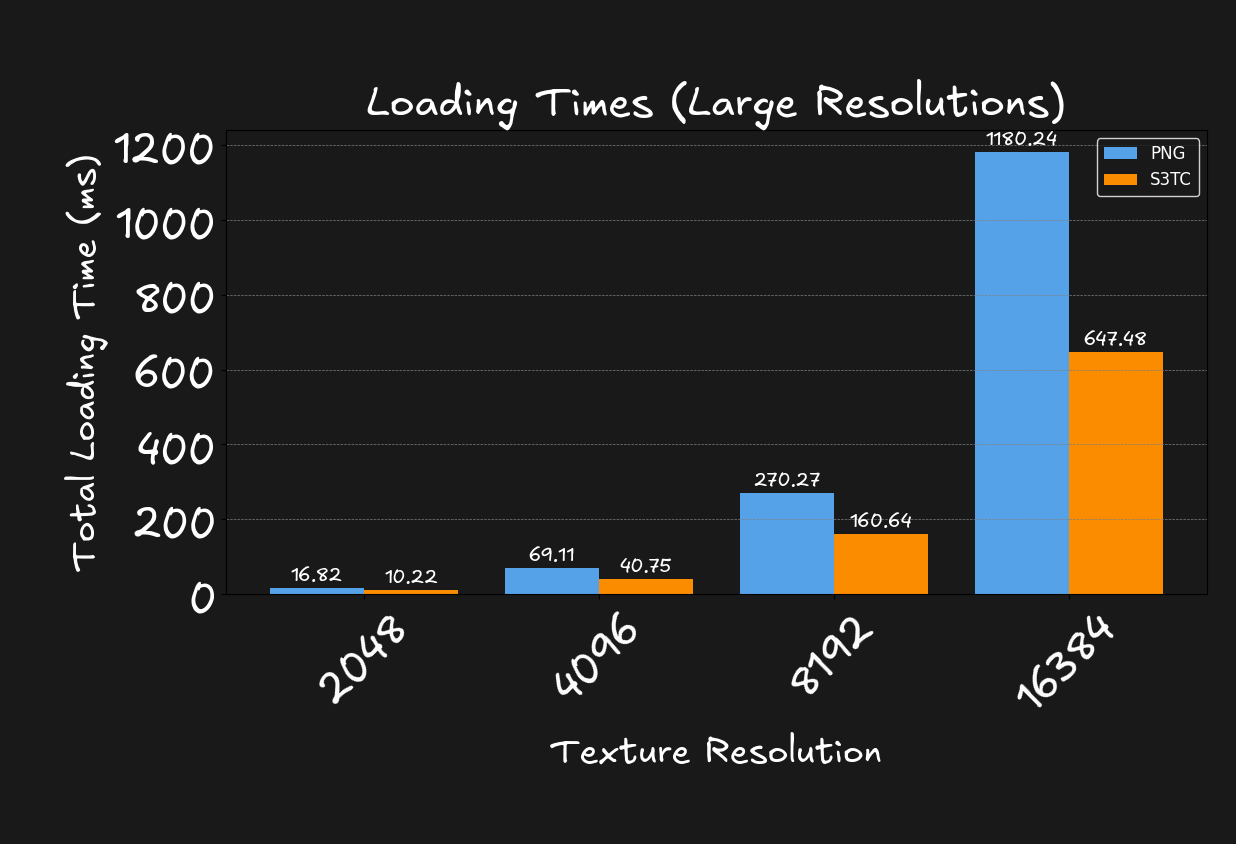
Looking at the graphs, we see that the difference in loading times between PNG and S3TC is around 40-60%.
Code/Implementation
Now that we know what S3TC is and how it works, let's look at how we can implement it in our engine.
There are 2 steps to this process.
- Compressing the texture
- Decompressing the texture
We first need to convert our PNG data, that we got from an artist, into RGBA data (with stb_image for example). The using the RGBA data, we can convert it to S3TC formatted data. I used the squish library for this.
//input data is the RGBA data
//output data is the S3TC formatted data
void Compress(const std::vector<unsigned char>& inputData, std::vector<unsigned char>& outputData)
{
    const int width = 1024;
    const int height = 1024;
    const ImageCompressionType compressionType = ImageCompressionType::DXT1;


    const int blockCount = ((width + 3) / 4) * ((height + 3) / 4);
    int compressedSize;

    int flags = -1;
    switch (compressionType)
    {
        case ImageCompressionType::DXT1:
            flags = squish::kDxt1;
            compressedSize = blockCount * 8;
            break;
        case ImageCompressionType::DXT3:
            flags = squish::kDxt3;
            compressedSize = blockCount * 16;
            break;
        case ImageCompressionType::DXT5:
            flags = squish::kDxt5;
            compressedSize = blockCount * 16;
            break;
        case ImageCompressionType::BC4:
            flags = squish::kBc4;
            compressedSize = blockCount * 8;
            break;
        case ImageCompressionType::BC5:
            flags = squish::kBc5;
            compressedSize = blockCount * 16;
            break;
        default:
            flags = squish::kDxt1;
            compressedSize = blockCount * 8;
            break;
    }

    // Compress the data using squish
    outputData.resize(compressedSize);
    squish::CompressImage(inputData.data(), width, height, outputData.data(), flags);
} // psuedo code
Now it's important that the compression is only done at development time. Compressing can take some time
and you don't want to do this every time you load the game. So you should compress the textures once and
save this to disk.
Then at runtime when loading the game, only thing you have to do is read the compressed data from disk
and upload
it to the GPU. For example with OpenGL:
//compressedData is the S3TC formatted data
void Image::LoadUsingS3TC(const std::vector<unsigned char>& compressedData)
{
    const int width = 1024;
    const int height = 1024;
    int channels = 0;
    const ImageCompressionType compressionType = ImageCompressionType::DXT1;

    GLenum format = GL_INVALID_ENUM;
    int blockSize = 0;

    switch (compressionType)
    {
        case ImageCompressionType::DXT1:
            format = GL_COMPRESSED_RGB_S3TC_DXT1_EXT;
            channels = 3;
            blockSize = 8;
            break;
        case ImageCompressionType::DXT3:
            format = GL_COMPRESSED_RGBA_S3TC_DXT3_EXT;
            channels = 4;
            blockSize = 16;
            break;
        case ImageCompressionType::DXT5:
            format = GL_COMPRESSED_RGBA_S3TC_DXT5_EXT;
            channels = 4;
            blockSize = 16;
            break;
        case ImageCompressionType::BC4:
            format = GL_COMPRESSED_RED_RGTC1;
            channels = 1;
            blockSize = 8;
            break;
        case ImageCompressionType::BC5:
            format = GL_COMPRESSED_RG_RGTC2;
            channels = 2;
            blockSize = 16;
            break;
        default:
            format = GL_COMPRESSED_RGB_S3TC_DXT1_EXT;
            channels = 3;
            blockSize = 8;
            break;
    }
    //...
    glCompressedTexImage2D(GL_TEXTURE_2D, 0, format, width, height, 0, size, compressedData.data());
} // psuedo code
To be able to use S3TC data, you need to add "GL_EXT_texture_compression_s3tc" as an extension when generating glad on https://glad.dav1d.de/.
Conclusion
S3TC is a great way to reduce loading times in video games. It's widely used in the industry and you can
find it in almost every game engine.
The trade-off between quality and speed is something you have to consider when using S3TC. For some
textures, the loss in quality is not noticeable. But for others, it can be a deal-breaker.
S3TC is not the only way to compress textures. There are other algorithms like ASTC, ETC, and PVRTC.
Each
with their own use cases.
If you want to learn more about texture compression, and see a bigger comparison between all the
formats, and not only S3TC, I recommend reading this
article by Aras Pranckevičius.
Sources
This article was written during my 2nd year at Breda University of Applied Sciences.